
It is common to think of the electron deflection tube as a device that demonstrates the behaviour of electrons within an electric field but in fact there are two electric fields at work. The first field accelerates electrons that are released by a heated coil then the second field deflects those electrons as they travel across the tube, as indicated in the diagram below.

The positive plate of the acceleration field, shown on the right of the diagram, is a short tube that forms the thermally-emitted (thermionic) electrons into a thin beam. The negatively charged electrons that are released by the heated coil are attracted to the positive tube and gain kinetic energy that is equal to the work done on the electrons, which is in turn equal to the product of the electron’s charge and the potential difference. The final velocity of the electrons can be calculated by equating the kinetic energy to the work done and rearranging as shown below;
velocity = sqrt (2qV / m)
Using an acceleration potential of 4.2 kV and substituting values for the charge on the electron (1.6 x 10⁻¹⁹ C) and the mass of the electron (9.11 x 10⁻³¹ kg) gives an electron velocity of 3.8 x 10⁷ m/s. This in turn allows the electron’s flight time through the deflection field to be calculated using the length of the horizontal path.
If we take the uniform field to be 8 cm long, discounting two half-centimetre regions at the ends of the pair of horizontal deflection plates where the field is likely to be non-uniform, then the electron will be passing through the deflection field for approximately two nano-seconds. A photograph of the complete apparatus used for this experiment is shown below.
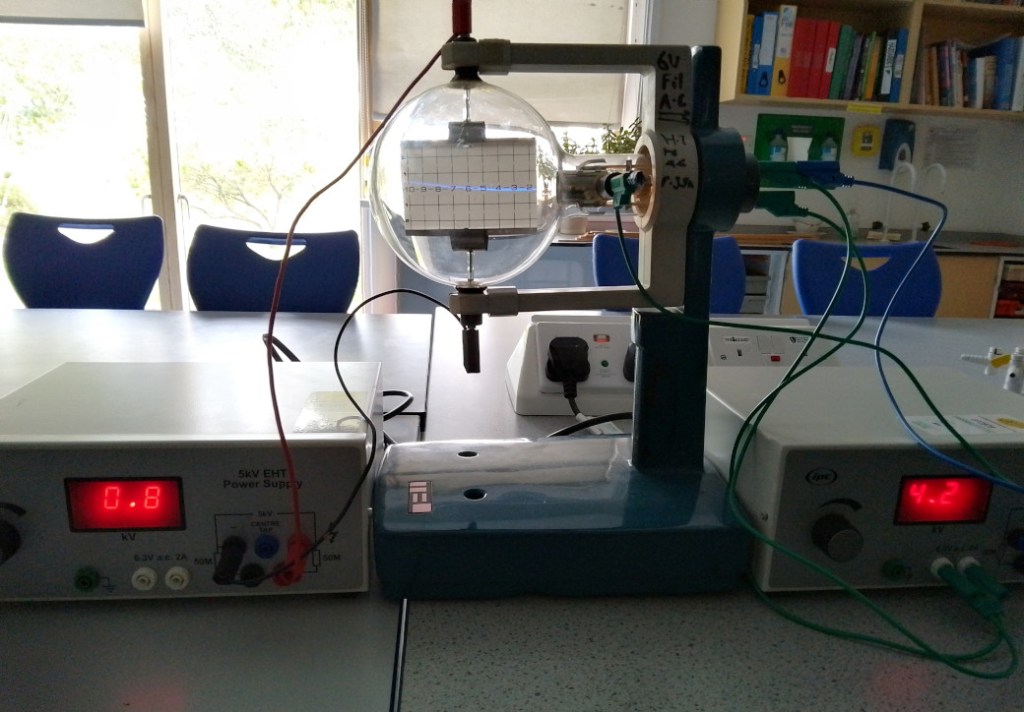
Of course, the electron will feel a new force as it moves through the deflection field and this will cause the electron beam to bend upwards (assuming that the positive plate is at the top) as is apparent in the picture above.
The deflection force is given by the product of the electron charge and the strength of the electric field that is causing the deflection. Conveniently, the strength of the deflection field is numerically the same whether it is expressed in volts-per-meter (the set-up parameters) or newtons-per-coulomb (the effect on the electron). These two expressions can be equated and rearranged to give;
force = qV / d
And this force will produce a new acceleration, perpendicular to the initial line of motion, that can be calculated using Newton’s second law by dividing the force by the mass of the electron;
acceleration = qV / md
The amount of deflection at any moment can be calculated using the familiar equation of motion that states;
displacement = 1/2 x acceleration x time2
In theory, the various equations that have been stated throughout this explanation could all be combined to produce a complete expression that determines the amount of deflection in terms of the strength of the acclerating field (giving the electron’s horizontal velocity) and the strength of the deflecting field (which determines the electron’s vertical motion). In practice, however, it is safer to calculate each stage separately to avoid carrying-over hidden errors from one part of the calculation to another.
For example, if the square-root stage in the velocity calculation had been missed then a much larger number would have made its way to the next stage but when confronted with the (wrong) value of 1.5 x 10¹⁵ m/s, which is faster than the speed of light, the mistake should immediately becomes obvious and demand correction.
The ideal shape of the electron beam’s path, assuming constant velocity in one direction and constant acceleration in a perpedicular direction, is a parabola and mirrors the trajectory of a projectile that is fired horizontally in a gravitational field (ignoring drag and other terrestrial effects).
It is left as an exercise for the reader to confirm that the maximum displacement of the electron beam will be slightly less than one centimetre when a deflection potential of 800 V is applied across the (approximately) 6 cm gap, as shown in the close-up photograph below.

